
Writing Web Server Programs With SIMPOL
In the previous part, we built our first basic program in SIMPOL and learned how to use the IDE to do various tasks. In this part, we will take that project and convert it into a web server application to output the same information to a web browser.
Converting Our Previous Project
As a first step, we can save our project from the first part as a new project. To do so, open the first project in the IDE and then select “Save Project As …” in the File menu
Then give the new project the name learn02 and select the tutorial directory as the place to store it. This will create a new project called learn02 with a main source file called learn02.sma.
Now start modifying the source code. Add a cgicall cgi parameter inside the parentheses of the main() function. Then add the include statement at the top as shown below and press Ctrl+S to save the document. The result should look something like the following picture:
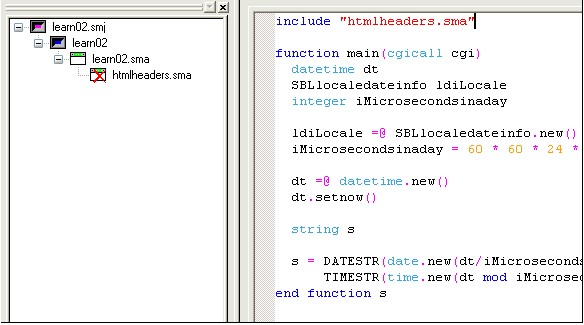
Note that the IDE has added a document as a child to the main document of the project but that the icon for the document has a red X through it. This is because at this point the project does not have any idea where to look for the include file. To fix this, let’s open the Project Settings window again and switch to the Includes and libraries tab.
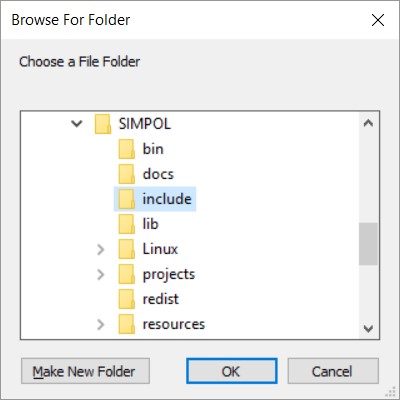
Now click the Add button on the left side of the window and select the include directory as highlighted below:
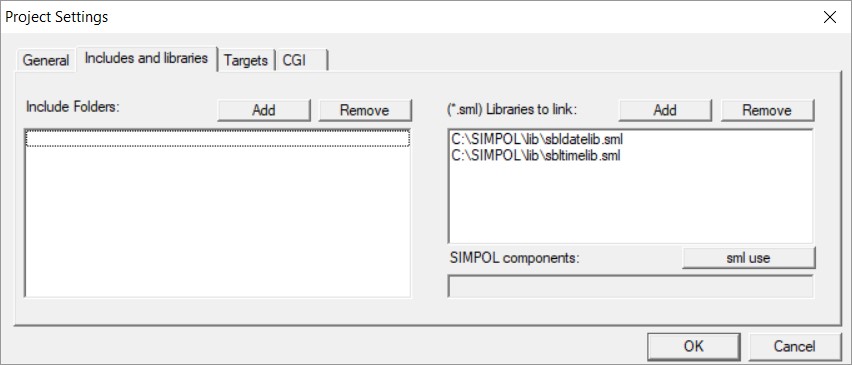
Press OK, the window should then look like the one below
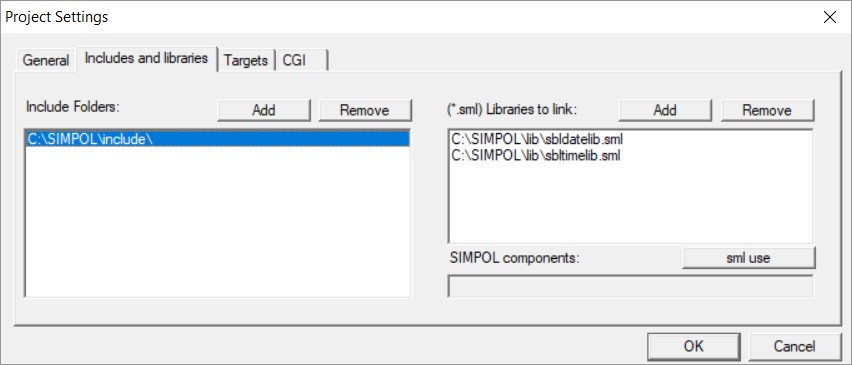
After clicking on OK the icon that previously was marked with an X should be back to normal.
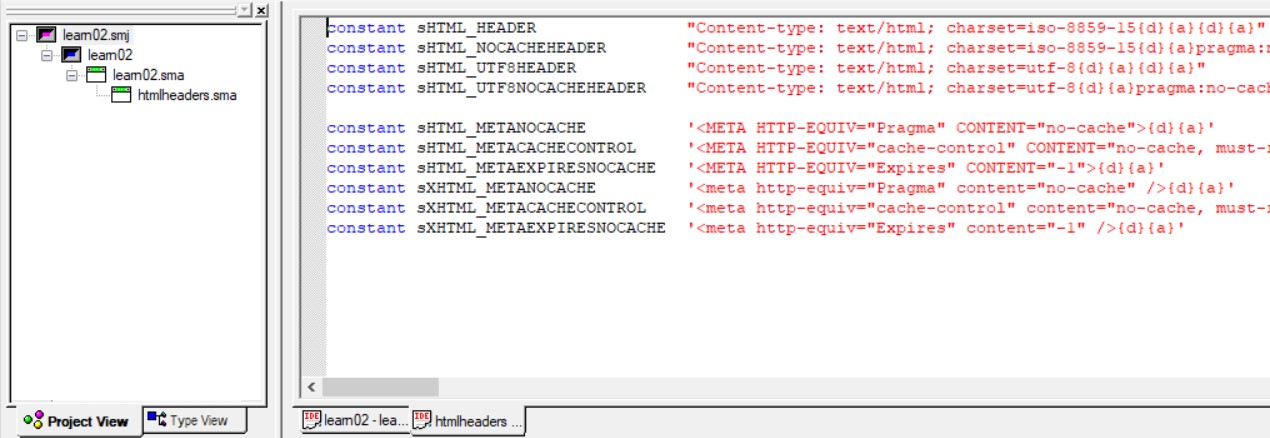
Now double-click the included file and copy the constant value sHTML_HEADER to the clipboard so that you can paste it into the main program file. The constant value can be used as long as it has been defined prior to it’s being used. Since the SIMPOL compiler is a single-pass compiler, that means that the file containing the constant needs to be included at the beginning of the program.
At this point we need to add the code that outputs the HTML page to the browser. Generally the second parameter to the output() method of the cgicall type will be set to 1, since currently most protocols require single-byte characters. The first thing that needs to be output is the header (unless you are using cookies, then they have to be first). After that the normal HTML code is output.
Now complete the code as shown below. The final argument following the end function statement is the empty string. This is because if it is not set to the empty string, the string representation of the value .nul will also be returned at the end of the HTML page.
include "htmlheaders.sma"function main(cgicall cgi)datetime dtSBLlocaledateinfo ldiLocaleinteger iMicrosecondsinadayldiLocale =@ SBLlocaledateinfo.new()iMicrosecondsinaday = 60 * 60 * 24 * 1000000dt =@ datetime.new()dt.setnow()string ss = DATESTR(date.new(dt/iMicrosecondsinaday), "mmmm dd, yyyy", ldiLocale) + " " + \TIMESTR(time.new(dt mod iMicrosecondsinaday), "hh:mm:ss.s am")cgi.output(sHTML_HEADER, 1)cgi.output("<html><body>The current date and time are:" + s + "</body></html>{d}{a}", 1)end function ""
Preparing the Web Server to Run SIMPOL Programs
We recommend people use an Apache web server, if not for deployment at least for development. We are going to be using a solution stack called AMPPS which contains Apache, MySQL, PHP and various other services. There are other ways of installing Apache but these are outside the scope of this basic introduction.
Getting and Installing AMPPS
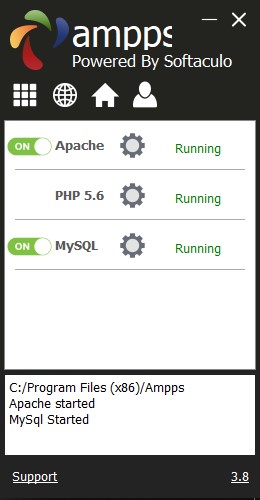
AMPPS is freely available to download, the latest version is available from https://www.ampps.com/download. Download and install AMPPS. Once you launch AMPPS it will look something like this:
Using a Web Server Other Than Apache
If you already have a web server running on your desktop, then you need to consult the documentation for it to find out how to run CGI programs using it. If the server runs as a service, you will need to open the Services applet from the Control Panel and then modify the service entry for your web server to allow it to Allow service to interact with desktop. This is needed if you wish to be able to debug your CGI programs in the Superbase NG IDE. Then set it up to execute programs that end in the file extension .smp as CGI programs. This may well need to know the location of the program used to run the applications and its name. The name of the program varies, depending on whether you are debugging or not. See the discussion of the Apache configuration below to learn about the various issues.
Configuring AMPSS Apache
Before we can run our program we also need to configure Apache. This section will discuss the changes that need to be made to the httpd.conf file.
| Note |
| This section describes the minimal configuration required to develop and deploy web applications using SIMPOL and should not be considered to be a replacement for reading and understanding the documentation of the web server! Deploying a web server can be a complex operation depending upon the level of use it is expected to sustain. There is an entire branch of the industry that handles the deployment and maintenance of high-availability web servers for e-commerce sites. Please don’t confuse basic configuration of a single web server with the knowledge required to deploy a web server that should be handling thousands of hits per second on a continuous basis. |
After AMPPS has been successfully installed, we need to find the AMPPS directory, this is normally found in: C:\Program Files (x86)\Ampps. In this directory there are a number of folders and sub-folders that will interest us:
Ampps>www>cgi-binAmpps>Apache>logsAmpps>Apache>conf
The cgi-bin directory is where our programs will normally reside. The logs directory is the place where the access and error logs are stored. The error log will be very important when trying to figure out why some program isn’t working correctly. Often some useful information will show up in the log, such as an error message from SIMPOL. Finally, and what concerns us currently the conf directory is where the configuration files can be found.
To access the config files necessary simply right click on the httpd.conf file and open in a text editor.
However, it is also possible to access the necessary configuration file for Apache from the AMPPS client. To do this you go to the settings for the Apache web server (left click on the gear) and then press the configuration button (as highlighted below)

At this point you will have opened the httpd.conf file and are ready to configure the server
The first item to change is the ServerAdmin parameter:
# ServerAdmin: Your address, where problems with the server should# be e-mailed. This address appears on some server-generated pages,# such as error documents. e.g. admin@your-domain.com#ServerAdmin johndoe@johndoe_world.com
Set the ServerAdmin parameter to your email address (or to whomever should be handling server problems).
The next parameter of importance is the ServerName parameter. For now, we will just change this to localhost. This can and should be changed to something else if you wish to deploy the server for more than development.
# ServerName gives the name and port that the server uses to
# identify itself. This can often be determined automatically, but
# we recommend you specify it explicitly to prevent problems during
# startup.
#
# If this is not set to valid DNS name for your host, server-
# generated redirections will not work.  See also the
# UseCanonicalName directive.
#
# If your host doesn't have a registered DNS name, enter its IP
# address here. You will have to access it by its address anyway,
# and this will make redirections work in a sensible way.
#
ServerName localhost
The DocumentRoot parameter should need no adjustment at this stage. You may wish to experiment with it later.
The ScriptAlias parameter for the /cgi-bin/ directory is one of the more important parameters for our project. That and the associated Directory parameter should be set up to look like the following:
# ScriptAlias: This controls which directories contain server scripts.
# ScriptAliases are essentially the same as Aliases, except that
# documents in the target directory are treated as applications and
# run by the server when requested rather than as documents sent to the
# client.  The same rules about trailing "/" apply to ScriptAlias
# directives as to Alias.
#
ScriptAlias /cgi-bin/ "{$path}/www/cgi-bin/"
# Each directory to which Apache has access can be configured with respect
# to which services and features are allowed and/or disabled in that
# directory (and its subdirectories).
#
# First, we configure the "default" to be a very restrictive set of
# features.
#
<Directory "C:/Program Files (x86)/Ampps/apache/htdocs">
Options ExecCGI
AllowOverride None
Order allow,deny
Allow from all
</Directory>
Restarting the Apache Web Server
Once the configuration is complete you have to restart the Apache Server, this is done by again pressing the settings cog in Ampps and then clicking the restart button

At this point you should be ready to start writing, running, and debugging SIMPOL web server programs. Before you go any further however, you should open your browser and enter the URL http://localhost/. If you don’t see a screen like the one below, you may have made an error in your configuration of the Apache web server. You will need to correct that before you can go on. Check the Apache documentation, and look at the log files. They may tell you what is wrong.

Debugging and Running Your Program
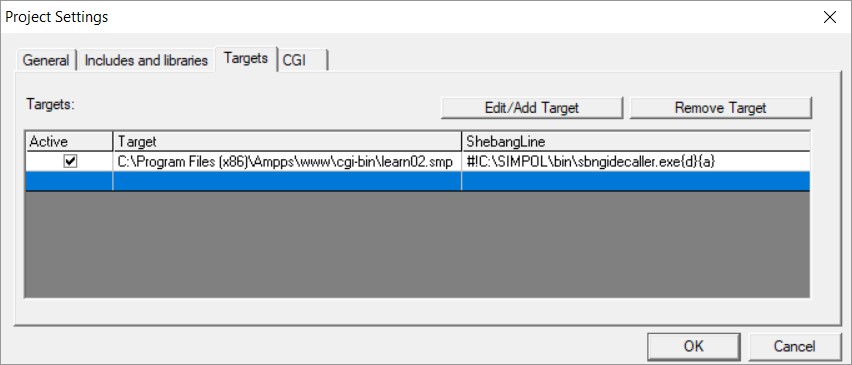
Finally, we are just about ready to actually run our web server program. There is only a little more preparation left to do so that we can run our program. First, to make our lives simpler, we need to add a secondary target for the build process. We do that by opening the Project Settings window and this time selecting the third tab labelled Targets, as shown in the picture below:

Click on the Edit/Add Target button. This displays the Target Manager window. On the left side of the window is a place to store common target directory names. On the right is a place to store common shebang lines.
Now you need to find the cgi-bin in your apache setup (this is your target folder for both the debugging and actual running of the software). For AMPPS this is normally found under: C:\Program Files (x86)\Ampps\www\cgi-bin\
| What’s a shebang line? |
| In some operating systems, most notably UNIX, Linux, and now Mac OS-X, it is common to place a special type of comment at the beginning of a script that is marked as executable by the operating system. This comment must be the first line of the script and begins with a comment symbol, the hash mark (#) followed by the exclamation point symbol (!) (sometimes called the bang symbol – presumably from its use in comic books). This combination the “hash bang” has come to be known as the shebang. Directly following this character combination is the path and file name of the program that should be used to execute the script that follows. Programs that are aware of this convention and which support it can use this method of determining the correct processing program so that the |
Create a target such as the one shown in the picture below. You may wish to add the target directory and shebang lines to the lists since you will probably use them often. In this case we are creating a debug target. The program called sbngidecaller.exe is used to make direct callbacks into the IDE.
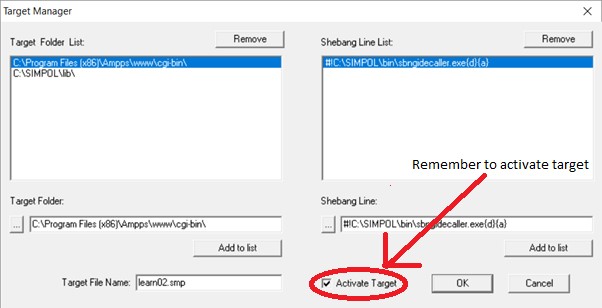
The shebang line is: #!C:\SIMPOL\bin\sbngidecaller.exe{d}{a}
The Target file name should be the same as the program, even if just to avoid confusion. Don’t forget to activate the target! Then click the OK button to create the target and then the OK button to save the changes. Finally, press Ctrl+B to rebuild the project and create the secondary target.

Now open a browser window and go to the following web address: http://localhost/cgi-bin/learn02.smp
The following box should then pop-up, press yes.
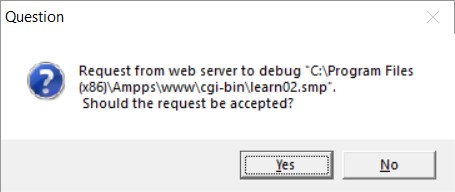
This message is from the IDE indicating that it has received a request to debug a program. If that program is not the current one in your IDE the current project will be closed and the project associated with the program to be debugged will be opened. At this point everything runs exactly the same as when debugging normally.
Simply press F5 to let the program just run through (this is where any bugs should turn up)
Once the debug has finished it will take you back to the browser, displaying an Internal Server Error. This is normal as we have only given it a debug not executed it properly
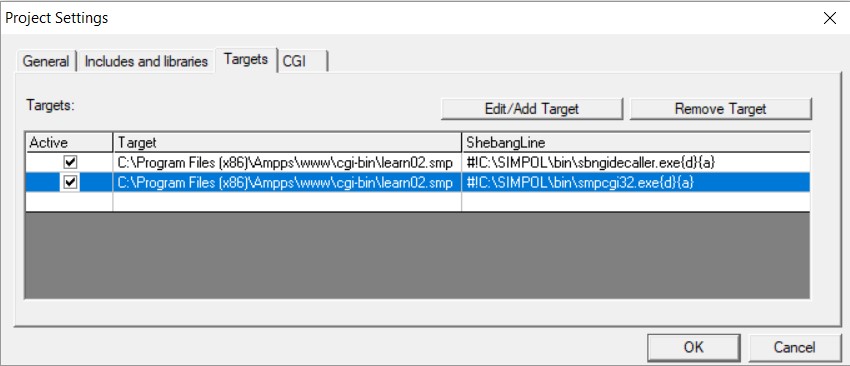
Now to display it in the webpage we need to add a second target, to do this again go to the project settings and click on the blank space
Then press “Edit/Add Target” click on the target address we used previously but add the following shebang line: #!C:\SIMPOL\bin\smpcgi32.exe{d}{a}

Again remember to tick Activate Target and then click the OK button to create the target and then again to save the changes. The project settings should now look like this. Now all you need to do is to rebuild the project.
| Note |
If more than one copy of the Superbase NG IDE are running concurrently then the first window that pops up will not be from the IDE about a request to debug, it will be from the sbngidecaller.exe program asking which copy of the IDE should receive the request to debug. Select the appropriate entry and then the debugging request message will appear. |
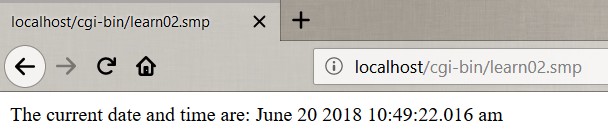
Now you can go back to the browser and refresh the page. It should now execute the program and display the time and date (the exact time and date will of course be different for you)
Optionally, you can now deactivate the debug target as it is no longer necessary
Summary
In this part we have learned how to:
- Save an existing project as a new project
- Add an external source file to our program with the include statement
- Add include directories to our project definition
- Use a constant in our code
- Convert a program to work as a web server application
- Retrieve, install, and minimally configure the Apache web server
- Work with targets in the IDE
- Debug a web server application
In the next part we will learn about debugging intothe source code projects provided for most of the SIMPOL libraries.