
The Main Screen
The main screen of Superbase NG Personal is the primary interface to reach the various modules of functionality that are provided. Most of this screen is fairly self-explanatory and the more complex areas will be covered in more detail in later parts of this tutorial
File Menu
Opening Data Sources and Tables
The second entry in the File Menu, Open is a submenu containing four entries: Data Source..., Table..., Form..., and Report.... If no data source is open, the option to open a table will be unavailable.
| Note | |
|---|---|
| An important point to make here is that in SIMPOL we have data sources, and database tables. Data sources are typically either a database container file or an IP address and port number used to connect to database tables being provided by that server. This differs from some desktop database products where the database table and the container are the same thing. |
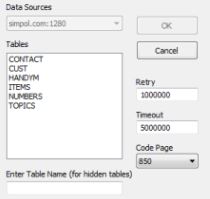
Selecting File → Open → Data Source... will display the following window:

By default, this window shows the information for opening a file-based data source in the format used by the SIMPOL Database Engine. If a data source is already open, the checkbox Open tables in new window should be ticked.
The checkbox “Show system tables” should not be activated. When ticked this will show the hidden system tables that every database container file created using the file creation tool contains. These tables hold additional information about the tables in the container and are called systables, sysfields, and sysfieldsext. They contain information not contained within the SBME format such as information for sharing using the PPCS server, the display formats, as well as a place to comment about fields for documentation purposes.
We can also open a PPCS data source, to do this select ppcstype1 as the data source type. This will change the window slightly

In this mode the Enter data source location box should contain either a domain name and port number, or an IP address and port number, instead of a file name. The Retry and Timeout values are expressed in microseconds and are by default one and five seconds respectively. A password can be entered if it is required.
If an SBME data source is being opened and there is only one table in the container (not counting hidden ones such as the system tables) the table should immediately open without any additional steps. If however more than one table exists in the file or if a PPCS data source is opened then an additional window is opened, from which one or more tables can be selected. If the source is a PPCS type a table name, if known, can be entered into the box at the bottom.
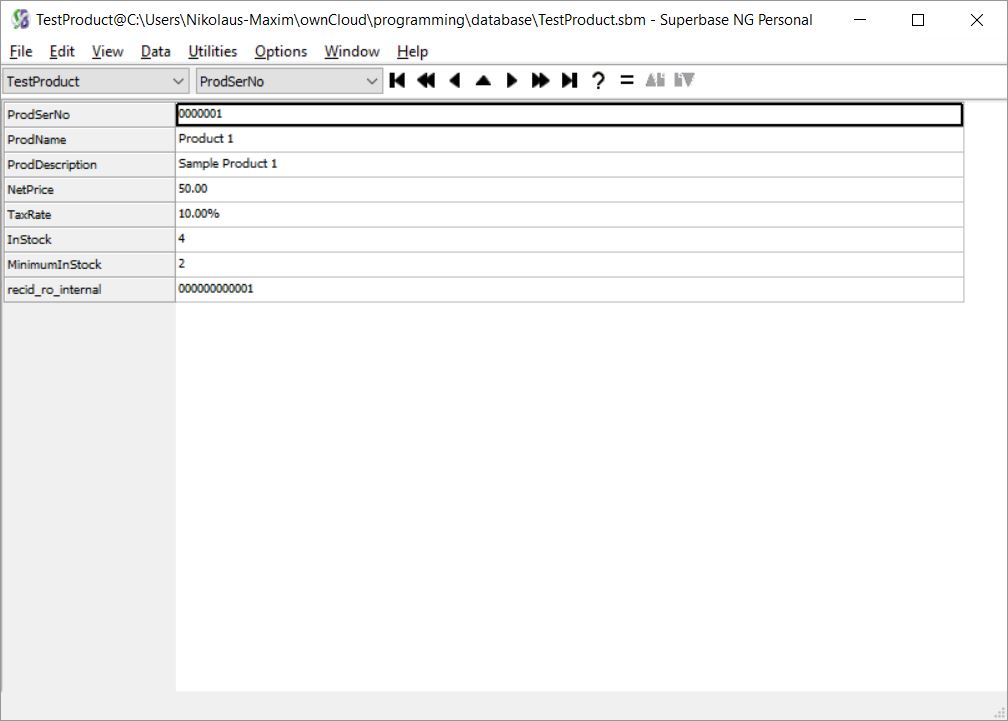
Once the selection(s) have been made and the OK button is pressed the tables will open and you will find yourself in Record view (by default)
Once a data source has been opened, the menu item File → Open → Table... becomes enabled and allows us to open more tables, as well as choose from which data source to select the table. This is true even in a new window which contains no tables. This can be used to open multiple windows and position them side by side to view different records
Opening forms
To open a form file that has been previously created and saved, use File → Open → Form... This opens a standard open file dialogue from which you can select the form file.
| Note | |
|---|---|
| Form files remember the data source information for the table that they are using. If the form is saved using a data source that is file-based, then if the tables using that data source are not already open, the form will attempt to open them from the last known location or from the current directory. If that fails, it will open the form but report that it is not valid for use. If the form is using PPCS data sources, then it will automatically attempt to connect to those sources, unless the tables it requires are already open. |
Closing Data Sources, Tables and Forms
Using the associated menu items in the File → Close menu, you can close the currently displayed table or form. Selecting the Data Source... you can close the currently displayed table or form. Selecting the Data Source... option will display the Select the data source to close window.
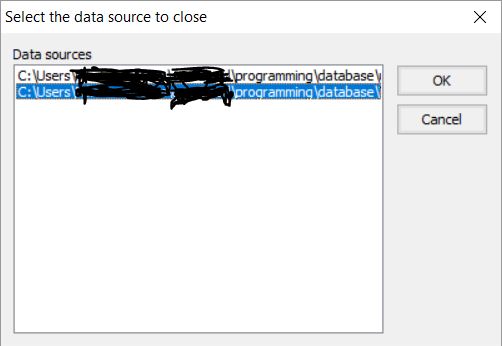
From here a single data source can be selected. Any open tables will be closed (in all open windows). Any form dependent on the tables will also close.
| Note | |
|---|---|
| Closing forms and tables is specific to a single window. Closing data sources applies to the entire application. |
Selecting File → Close → All will close all database tables, data sources, and forms in all open windows.
Removing tables
If the current table is from an SBME data source the File → Remove... menu item will be enabled (it is not possible to remove tables from a PPCS server). Superbase will ask for confirmation before deleting the table. If the table is the only non-system table in the container, it will also ask whether you want to delete the container file as well
Printing with Superbase NG Personal
There are three menu items that refer to printing: Print..., Print Setup..., and Page Setup...
Print Setup
Print Setup presents the following standard Windows window:
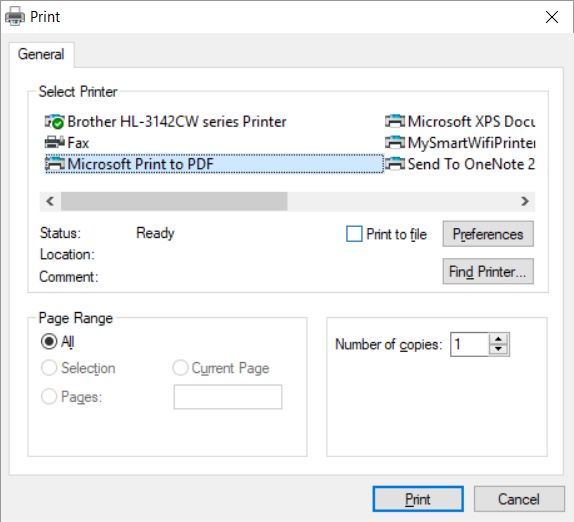
This window is primarily used to change the printer from the default to another. You can also tweak other settings regarding printing by clicking Preferences
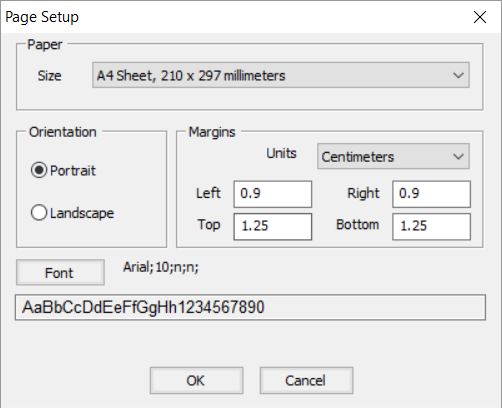
Page Setup
Page setup can be used to modify the default font, page orientation, paper size, and margins.
| Note | |
|---|---|
| The page margins may not be respected by all modules; especially when printing a form, or working with a quick report that has other page margins specified. |
There are currently eight different print options:
Record: Print the current record in the current table
Table: Print all the records in the current table
Form: Print the current form
Forms: Print all records in the current table using the current form
System status: Print the current system status
Table Status: Print the status information for the current table
Form Status: Print the status information for the current form
Report status: Print the status information for the current report
These options are not always enabled, they are dependent on whether a table or a form is open.
A form is printed as a rough approximation of the display form. This technique is not precise, because display forms are designed in pixels and printed forms are designed in micrometres. On top of this, the fonts used on display forms may look as if they have sufficient spacing when in fact, they do not allow enough space. When developing an application it is a better choice to design dedicated print forms for the content as in a SIMPOL program, the print form can be loaded, the correct record selected and then sent off to the printer without ever displaying the form on the screen
The system status lists the currently open data sources, the currently open windows, and within each window the open form (if any) and the currently open tables.
The table status shows information about the currently shown table, including its name, data source, record count, indexed field list, and then the entire field list.
The form status shows information about the current form, including its properties, and any data sources, tables or links (if present) as well as the forms width, height and detailed information about each controls
Importing data
The import functionality currently supports importing from CSV, ASCII-Delimited, and XML. You can import into anew database table or merge it with an existing one. If merged with an existing one, the incoming data must be in the correct order (must watch the field order in the table) and of the correct data type. Importing into a new table will create only text fields, no attempt is made to assess the field data type during import. Following the import of the data into a new table, the modify table window will be displayed and changes can then be made to the table definition, including creating indexes. If changes are made to the data type of fields, it is recommended to reorganise the table before creating any indexes
| Note | |
|---|---|
| Importing data such as dates and times is complicated. The data enters the database as text and there is no easy way to convert the data into dates or times. For this sort of import, it is better to create an empty database with the correct data structure first, and then import merge the data into the empty database table. |
Shown below is the import dialog for the CSV format
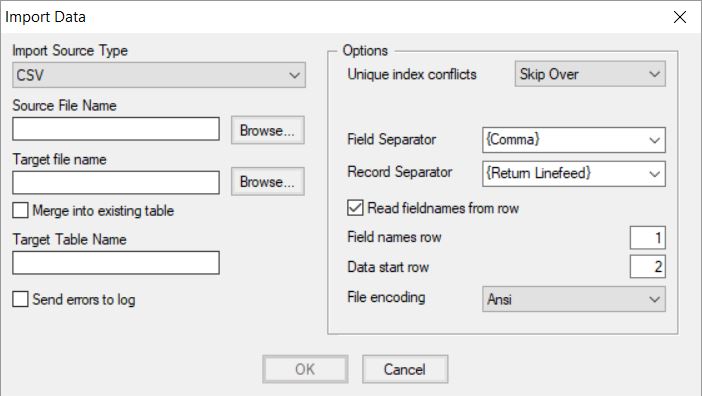
CSV stands for “comma-separated values” in SIMPOL the implementation allows the specification of the field and record separators characters, supports having the first row contain field names and allows the specification of the starting data row. It also supports embedded newline characters. Fields containing data that include the record or field separator characters must be delimited with double-quotes. Within these sections, embedded double-quote characters are doubled as an escape mechanism. In SIMPOL this format currently only supports ANSI
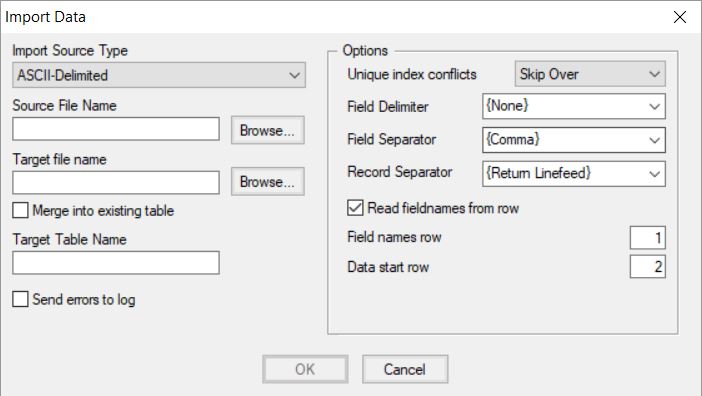
The ASCII-Delimited import allows the specification of field and record separators, as well as an optional field delimiter. If defined this field delimiter must be found around all field entries. This format is faster but does not support embedded newline characters or other escape mechanisms aside from the use of the field delimiter character. This format does not currently support code pages or Unicode. The import window is shown below:
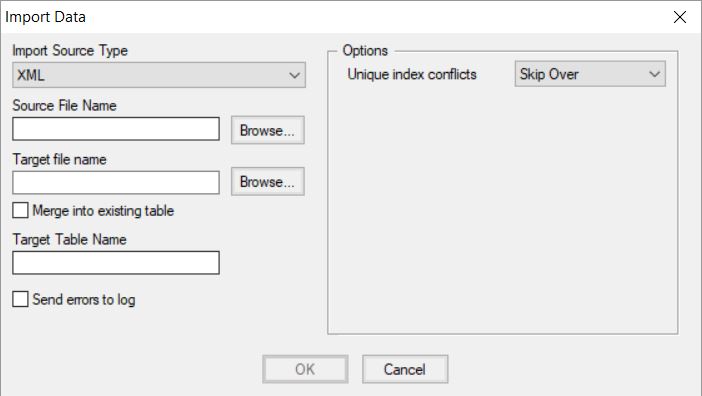
The last supported import format is XML. The format is quite simple. The XML file can start with a byte order mark (BOM) and can be in UTF8, UTF16LE (2-bytes per character Litlle-Endian) or UTF16BE (2-bytes per character Big-Endian) format. If no XML declaration is found the content will be assumed to be in UTF8 format. The root tag is assumed to be the table name, the first child tag is assumed to be the row tag. Within each row tag should be the data. There is no support for attributes for defining data type or other information. Each record should include all fields, even if they are empty
Below is a sample XML file:
<?xml version="1.0" encoding="UTF-8" ?> <DRIVERS> <row> <DriverID>0</DriverID> <Comments></Comments> <Forename>Fred</Forename> <Surname>Jones</Surname> <Telephone>555-1234</Telephone> <Email>fred@jones.org</Email> </row> </DRIVERS>
In the example, the DRIVERS tag represents the table name and the row tag is used to group the data into records
Exporting Data
Just as there are three formats supported by the import functionality, the export functionality supports only three formats: ASCII-Delimited, CSV, and XML. The same as the import function, the formatting is also the same as that that is used by the import function.
The Edit Menu
The entries found in the Edit menu are meant to apply to copy, cutting, pasting and deleting records in the currently displayed table. This works as expected, but it is important to note that if a field selection is active, then only those fields will be sent to the clipboard, when copying or cutting, and when pasting the content of the clipboard will only be assigned to the fields in the selection, in the order, they exist in the selection. Multiple records can be pasted in one operation. Data is copied to the clipboard as text in a tab-delimited, carriage-return linefeed delimited format. It is expected to be in the same format when pasting.
The View Menu
There are four entries in the View menu: Table, Record, Form, and Field Selection. If no form is open, then the Form entry will be disabled. If no database table is open, then the Table, Record, and Field Selection entries will also be disabled. Opening a new table defaults to showing it in record view unless you are currently in table view. If a form is shown, it is possible to switch to record or table view to see fields that may not be shown on the form. It is also possible to change tables to examine records in those tables. In form view, the master table of the form is set as current and the table selecting tool on the toolbar is disabled.
Using Field Selection
The field selection provides a method of defining a view, a list of fields from the current table (either in record or table view) that can be a subset of the total list of fields, and arranged in any order. It can contain duplicates and when a field selection is active it applies to copy and pasting of records, imports and exports, as well as what is shown in record and table view
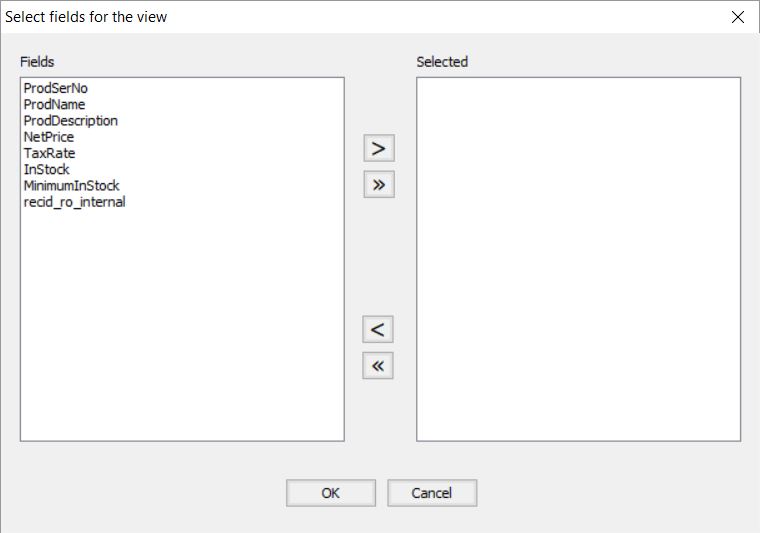
The field selection is remembered across sessions for each table and will be presented as the default in the dialogue window when this menu option is selected
Data Menu
The Data menu provide provides a set of functions that are used to add, change, duplicate, save and remove records from a database table. It also has an entry called Quick Report..., which is the gateway to the ad-hoc reporting facility, this is covered in more detail later in a different section. The filter functionality allows the creation of floating selection lists and is also covered in its own section later in the tutorial. The filter is actually data. The records are read into the floating window’s grid control and once it completes new records will not be added to the record.
Most of the functionality is self-explanatory, but a few points may help clarify common issues. Add will create a blank record in the current database table in record view. In form view, it will call the form’s newrecord() method, which creates a new record, blanks the form and places focus on the first viable control in the tab order. The duplicate function creates a new record and then copies the current one into it, then makes the newly copied record the current record for editing. The remove menu has four entries: Cascade is currently not supported. Current deletes the current record in both record and form view. Group... opens the filter window and allows you to delete a sub-section of records within certain criteria. The final item removes all records from the table
| Tip | |
|---|---|
Remove → All has an optimization capability and if not used it must delete every record individually. To use the optimization method, it is best to open the table in record view and then do the removal of all the records. This is much faster since the table is reorganized to a temporary name but without any records being copied, then the original is closed, deleted, and the new one is renamed. This optimization cannot be used via PPCS access. |
Utilities Menu
This menu provides a windowed output of the system and table status mentioned earlier. These can be marked and copied to the clipboard. The Reorganize… item is used for disk-based tables. This is a very important utility that is used to repack the database. It can also do database repair, should an index somehow become corrupted. A standalone command-line program called reorganize.smp is also available as part of Superbase NG.
The Properties Browser is an early stage browser that can be useful when attempting to understand certain data structures at run time. The window opens looking like this:
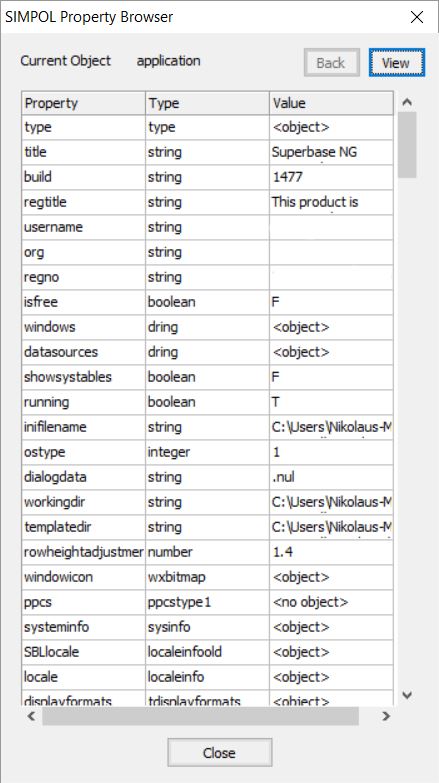
This version of the properties browser is quite rudimentary, but even so, fairly powerful. To investigate an object, click on the cell containing the object and then click on the View button or double-click the left mouse button on the grid entry. To back up to the previous object, click on the Back button. This is primarily meant for programmers that are trying to understand complex types that may be difficult to follow in the debugger
Options Menu
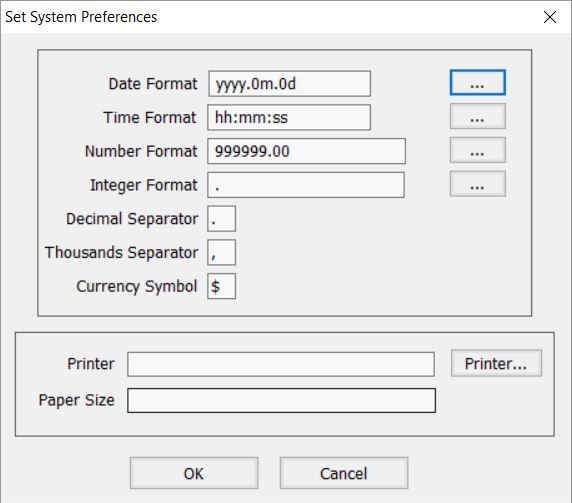
There are currently three options in this menu: Tool Bar, Status Bar, and System... The first two of thee are used to turn on or off their respective areas to increase the client are of the window. Turning off the status bare could mean missing messages from the system, such as when a record is saved or the end of the table is reached. The final option here is used to set system preferences for formatting as well as the printer preferences:
Window Menu
This menu has four entries: New Window, which creates another top-level window with a menu and toolbar that is identical to the first, except with no tables or forms open. The other three entries are for managing already open windows: Close closes the current window, if this is the last it will ask whether you wish to close the application; Tile will arrange all of the available windows in a tiled pattern on the desktop; Cascade arranges the windows to overlap each other on the desktop